Story map
Document an entire system's functionality
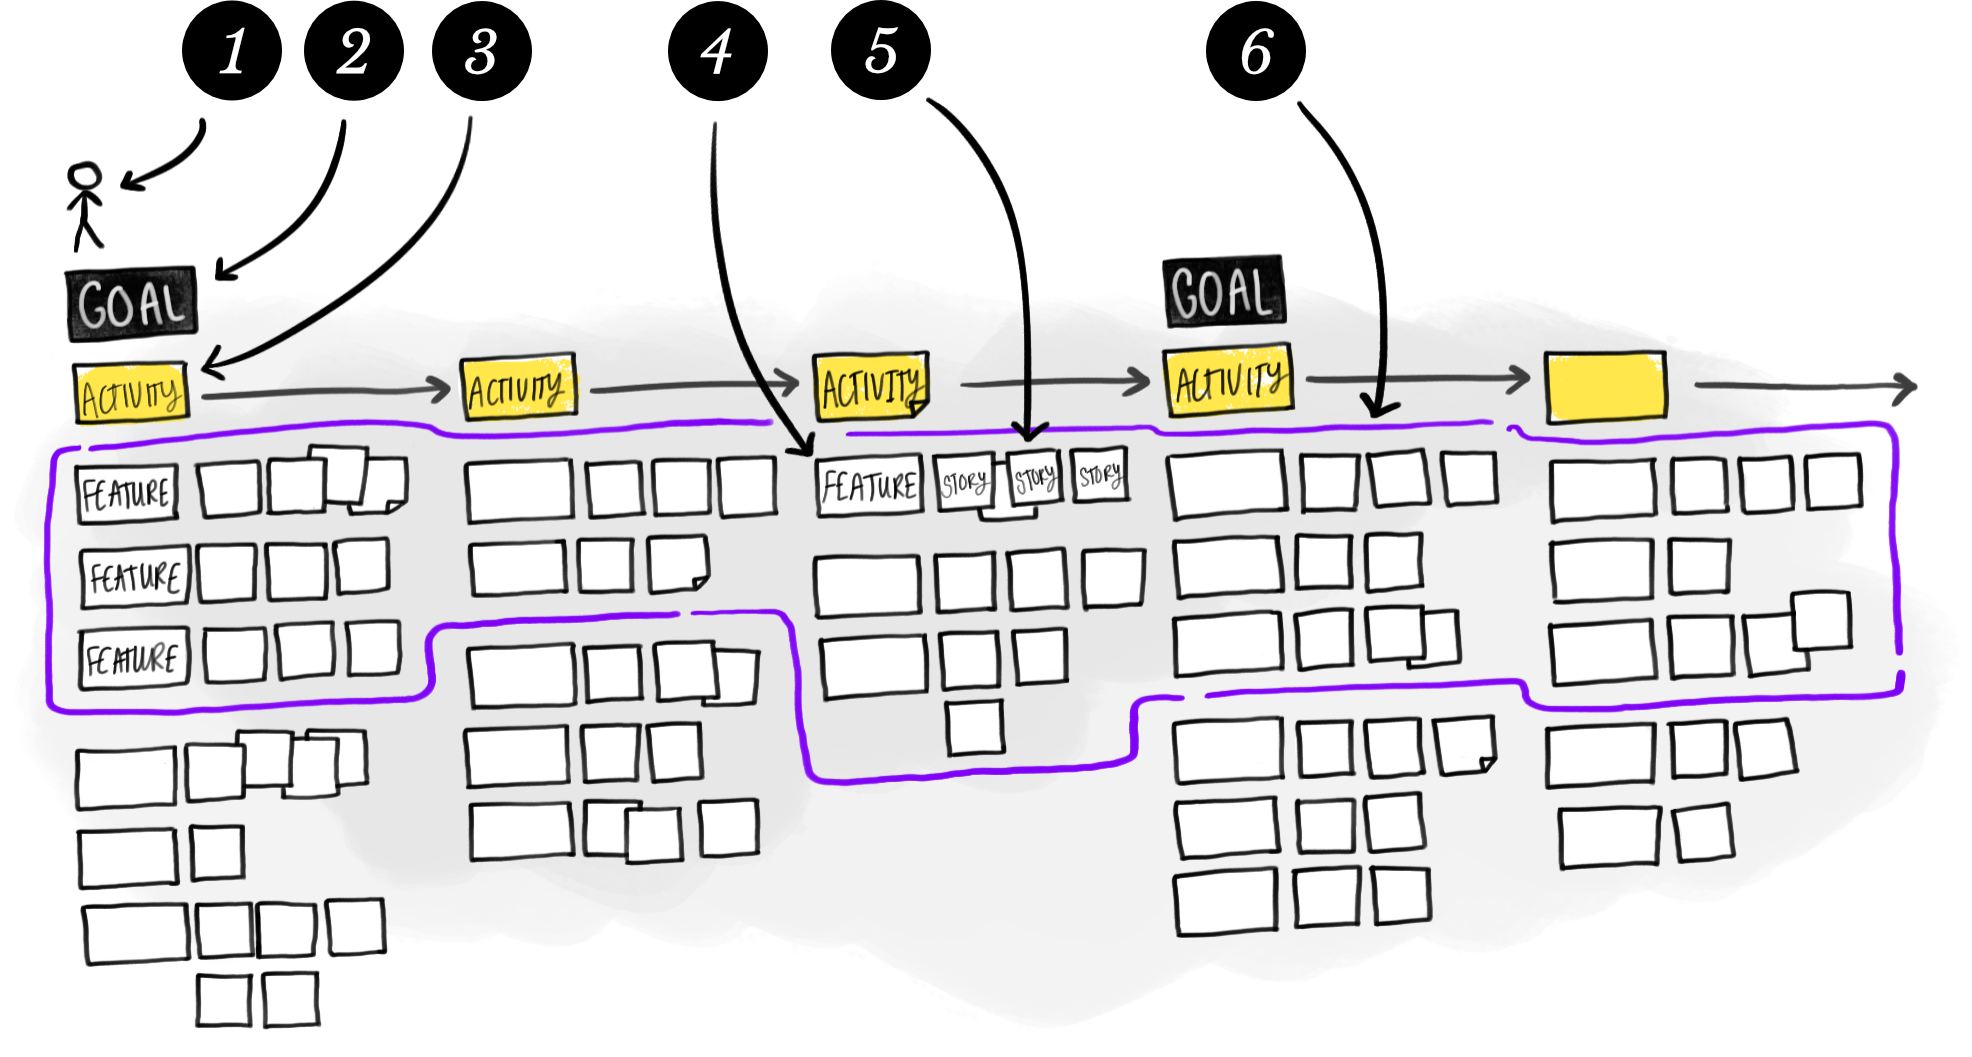
<p>A visual representation of a Story map.
The top level has “Goals”. There are only a few goals listed.
Under “Goals” there are “Activities” listed horizontally.
The “Activities” belong to a “Goal” and there are many “Activities” for each goal depicted.</p><p>Under each “Activity” there are “Features” listed vertically. There are many
“Features” for each “Activity”.</p><p>To the right of each “Feature” there is another horizontal list of “Stories”.
There are many “Stories” for each “Feature”.</p><p>Some of the “Features”, and the “Stories” associated with them, are further grouped
into a “Release”.</p>
Elements
- User: who will be using your system (think role rather than person).
- The user’s goals: what the user is trying to achieve—this is optional.
- Journey/activities: the steps the user must take to achieve their goal.
- Tasks/features: the features a system might have to enable the user to complete the activity.
- Stories: the developable pieces of work that help to create features in the system.
- Releases: a shippable set of features (think MVP and future updates).
What it is
A Story Map documents an entire software system’s functionality. It connects all the different elements of the system focusing on the users of the system. It plots the connections between the user, what they are trying to achieve, the steps involved, the features of a system that enable those steps, and the development work that creates those features.
In essence, Story Maps help teams ensure they are building something worthwhile by ensuring that they never lose sight of the user journey.
Often large and complex, a Story Map is used to scope a project, prioritise features, estimate development work, and plan releases. Along the way, they help identify gaps and build a shared understanding of the system.
When to use it
- When starting a new project. Use a Story Map when you have high-level requirements and need to break them down into developable chunks.
- When planning a sensible Minimum Viable Product (MVP) release, Story Maps make prioritisation of features easy!
How to use it
- Start with your primary user. Write the name of your primary user on a card and put it at the top left of your board.
- Define your user’s primary goal. Add a card directly under the first card labelled with the first thing a user is trying to do (i.e., a goal). Keep this high level and short!
- Build your activity layer. Starting under your first goal, add a card for each activity your user does when they are completing the goal.
- Narrative test! You should be able to read across the activity layer and provide a short, but vaguely sensible, narrative. If you can’t, then you’re missing something or your activities are out of order. Rework as necessary.
- Zoom out. Back on the goal layer, add more cards to the right to capture any other goals your user has. For each of these goals you’ve added, repeat the above steps.
- Now that you have a backbone of activities (the what), switch focus to the system features (the how). With your team, brainstorm all the features that would contribute to that activity and list them under the relevant activity.
- Prioritise. Reorder each feature list by importance, from highest to lowest.
- Build your development branches. For each activity, add cards to the right that capture the development work involved in delivering that feature. You’ll need your technical peeps here!
- Next user please! Repeat the whole process with your other users (e.g., admins, editors, superusers, etc.) until you have your entire system mapped.
- Optional: Slice your map into releases. Use the vertical space to organise your features and development work into releases.
Rules for use
- Work left to right. Work with the story and keep your map in rough time order. This makes it much easier to identify gaps.
Guidelines
- Start with the user. Work down from the user to their goals, then end with features and stories.
- Colour-code the different elements of your map. For example, goals are green, tasks are blue, etc. Be consistent. This makes it easier to follow along.
- Stay focused. Try to complete at least a draft of each layer before moving onto the next.
Tips & tricks
- Listen to the story. Try asking your users to talk you through a typical day, then use their narrative to capture the relevant activities on the map.
- Document your key (the legend) where everyone can see it! This makes it easy to stick to it.
- Make sure you have enough time and space! Small, cramped rooms and short timeframes mean you will struggle to get value from your efforts.
- Don’t chase the perfect pattern. No two projects are the same and no two Story Maps are the same.
- If you have them, you can use personas to prioritise your features (e.g., “what is more important to this person, feature A or feature B?"")
- Build your enhancement backlog. Capture both features that are absolutely required and features that would make activities smoother or nicer. This will help your team plan a truly viable product.
- Plan your releases. Story Maps can also be used as a visual release planning method if you’re already underway on a project.
- Remember: you don’t need all the peeps all the time. For big stakeholder groups, split them into small groups and follow a validate/add cycle with each group. Each will be able to validate the work of previous groups, identify gaps, and add their own knowledge.
Common issues
- Not having all the stakeholders involved. Each stakeholder not involved in building the Story Map represents a potential loss of perspective or knowledge and buy-in.
- Personas as your base. If you cut your map by personas—rather than broad user roles—you’ll end up with feature duplication in your map and a prioritisation nightmare! Instead, use your personas to validate your activities and prioritise your features.
- Solo mapping. Just don’t.
- Unnecessarily complex. Not every system is large enough to warrant all five levels of the map. Sometimes simply user → activity → story is enough!
- Not having an agreed upon key (i.e., legend). You need all the help you can get to remember what the difference is between the green and the yellow cards!
Related methods
- User story: describe user requirements by why, not what.
- Acceptance criteria: define a feature in yes or no terms.